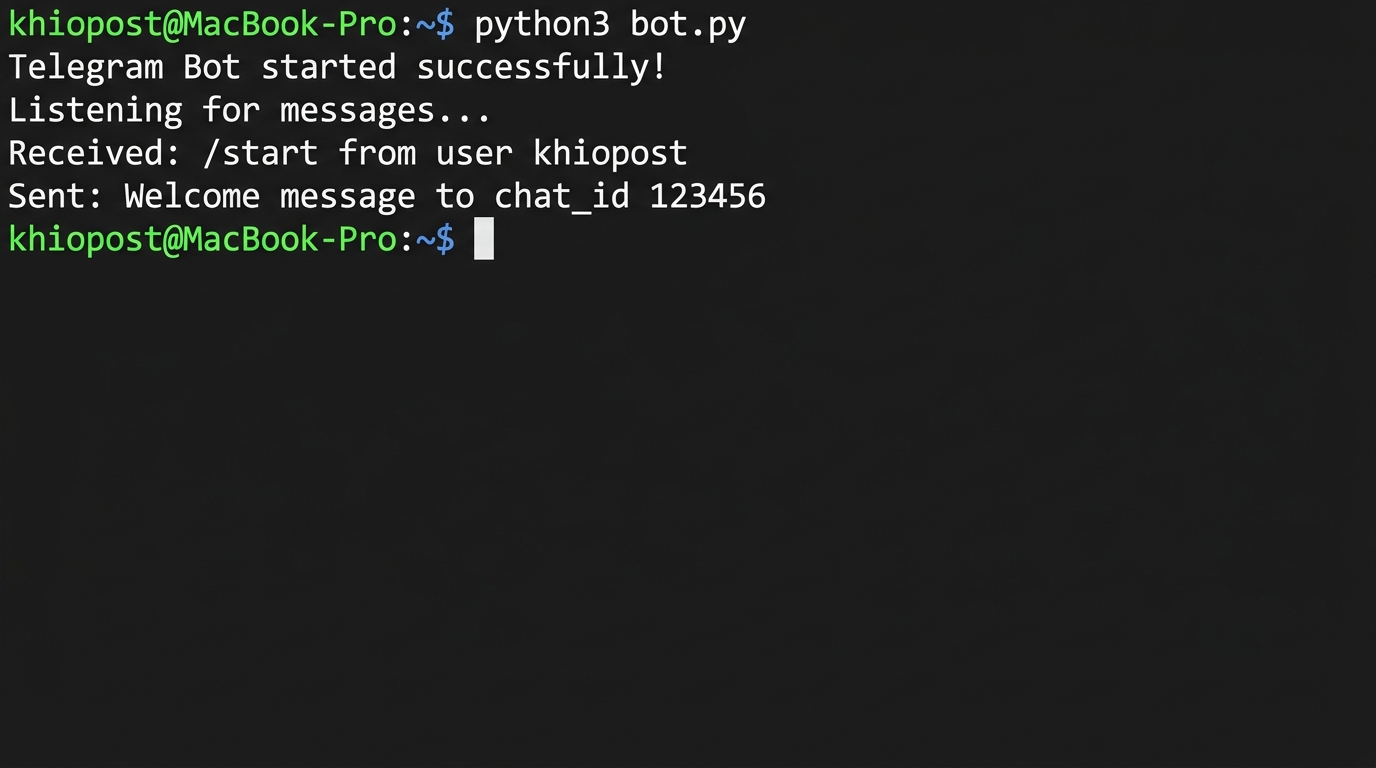
이 글을 끝까지 따라하면, 텔레그램으로 서버 상태 알림을 받을 수 있는 봇이 완성된다. 배포 성공하면 “✅ 배포 완료”가 날아오고, 서버 CPU가 90%를 넘으면 “🔥 서버 과부하” 경고가 폰에 뜨는 그 봇을 말하는 거다. 슬랙이나 디스코드 웹훅도 써봤지만, 결국 가장 빠르게 확인하는 건 텔레그램이었다. 앱 알림이 바로 오니까.
나는 사이드 프로젝트 서버를 모니터링하려고 텔레그램 봇을 처음 만들었는데, 솔직히 BotFather 대화부터 chat_id 얻는 과정까지 삽질을 좀 했다. 공식 문서가 영어인 건 그렇다 치고, “chat_id를 어디서 가져오는 건데?”에서 30분을 날린 기억이 있다. 이 글에서는 내가 겪은 삽질 포인트까지 포함해서, 복사-붙여넣기만으로 동작하는 봇을 만드는 과정을 정리했다.
📑 목차
완성물 미리보기 — 어떤 봇을 만드는가
최종적으로 만들 봇의 기능은 세 가지이다. 관련 내용은 Cloudflare Workers Cron Trigger 설정에서도 다루고 있다.
- 서버 상태 알림: CPU, 메모리, 디스크 사용량이 임계값을 넘으면 텔레그램으로 경고 메시지 전송
- 배포 완료 알림: GitHub Actions 등에서 배포가 끝나면 결과를 텔레그램으로 받기
- 일일 리포트: 매일 아침 9시에 서버 상태 요약을 자동으로 받기
기술 스택은 Python 3.8 이상, requests 라이브러리, 그리고 Telegram Bot API가 전부이다. 별도 프레임워크 없이 HTTP 요청만으로 구현한다. python-telegram-bot 같은 라이브러리도 있지만, 알림 전송 용도라면 requests로 직접 호출하는 게 의존성도 적고 이해하기 쉽다.
BotFather로 봇 생성하고 토큰 받기
텔레그램 봇을 만들려면 먼저 BotFather와 대화해야 한다. BotFather는 텔레그램 공식 봇 관리자로, 새 봇 생성부터 설정 변경까지 전부 여기서 처리한다.
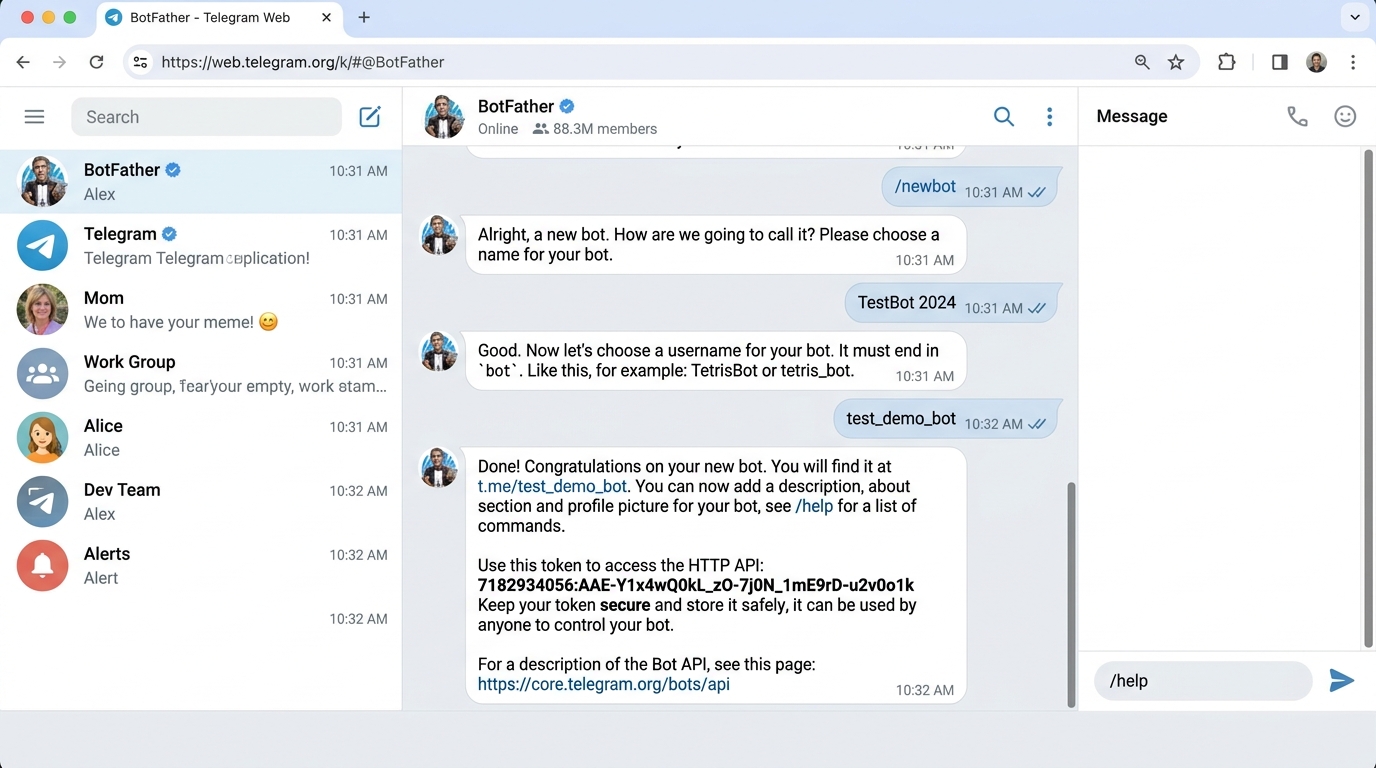
BotFather 대화 과정
텔레그램 앱에서 @BotFather를 검색해서 대화를 시작한다. 아래가 실내 대화 흐름이다.
나: /newbot

BotFather: Alright, a new bot. How are we going to call it?
           Please choose a name for your bot.

나: My Server Alert Bot

BotFather: Good. Now let's choose a username for your bot.
           It must end in `bot`. Like this, for example:
           TetrisBot or tetris_bot.

나: myserver_alert_bot

BotFather: Done! Congratulations on your new bot. You will find it
           at t.me/myserver_alert_bot.

           Use this token to access the HTTP API:
           7123456789:AAH_your-token-will-appear-here_abc

           For a description of the Bot API, see this page:
           https://core.telegram.org/bots/api
여기서 받은 토큰이 핵심이다. 7123456789:AAH_your-token-will-appear-here_abc 형태의 문자열인데, 이걸 절대로 GitHub 같은 공개 저장소에 올리면 안 된다. 누군가 토큰을 가져가면 내 봇으로 아무 메시지나 보낼 수 있다.
토큰을 받았으면 추가 설정도 해두겠다.
나: /setdescription
BotFather: Choose a bot to change description.
나: @myserver_alert_bot
BotFather: OK. Send me the new description.
나: 서버 상태를 모니터링하고 알림을 보내는 봇입니다.
BotFather: Success! Description updated.

나: /setcommands
BotFather: Choose a bot to change the list of commands for.
나: @myserver_alert_bot
BotFather: OK. Send me a list of commands.
나: status - 현재 서버 상태 확인
       help - 사용 가능한 명령어 보기
BotFather: Success! Command list updated.
setcommands를 해두면 봇 대화창에서 /를 누를 때 명령어 목록이 나온다. 나중에 봇을 확장할 때 유용하니 미리 해두는 걸 추천한다.
chat_id 확인 — getUpdates API 호출
토큰만으로는 메시지를 보낼 수 없다. 어디에 보낼지, 즉 chat_id가 필요하다. 이 부분에서 처음 만드는 사람들이 많이 헤맵니다. 나도 그랬고요.
과정은 간단하다. (1) 내가 만든 봇에게 아무 메시지나 보냅니다. (2) getUpdates API를 호출해서 그 메시지 정보를 확인한다. 거기에 chat_id가 들어있다.
import requests
import json

# 1단계: 봇 토큰 설정
BOT_TOKEN = "7123456789:AAH_your-token-will-appear-here_abc"
BASE_URL = f"https://api.telegram.org/bot{BOT_TOKEN}"

# 2단계: 텔레그램 앱에서 봇에게 아무 메시지나 보낸 뒤 실행
response = requests.get(f"{BASE_URL}/getUpdates")
data = response.json()

# 전체 응답 확인
print(json.dumps(data, indent=2, ensure_ascii=False))

# 출력 예시:
# {
#   "ok": true,
#   "result": [
#     {
#       "update_id": 123456789,
#       "message": {
#         "message_id": 1,
#         "from": {
#           "id": 9876543210,
#           "first_name": "Kyunghun",
#           "language_code": "ko"
#         },
#         "chat": {
#           "id": 9876543210,      <-- 이게 chat_id
#           "first_name": "Kyunghun",
#           "type": "private"
#         },
#         "text": "안녕"
#       }
#     }
#   ]
# }

# chat_id 추출
if data["result"]:
    chat_id = data["result"][0]["message"]["chat"]["id"]
    print(f"chat_id: {chat_id}")
else:
    print("봇에게 먼저 메시지를 보내세요!")
주의할 점: getUpdates의 result가 빈 배열 []로 나오는 경우가 있다. 세 가지 원인이 있는데, (1) 봇에게 아직 메시지를 안 보냈거나, (2) 이전에 getUpdates를 호출하면서 offset 파라미터로 업데이트를 소비한 경우, (3) 24시간 이상 지난 업데이트는 자동 삭제되기 때문이다. 가장 확실한 방법은 봇에게 메시지를 새로 보내고 바로 getUpdates를 호출하는 것이다.
그룹 채팅에 봇을 추가한 경우, chat_id는 음수(-)로 시작한다. 개인 채팅은 양수이다.
Python으로 메시지 보내기 — sendMessage, sendPhoto
이내 핵심이다. chat_id와 토큰이 있으면 메시지를 보낼 수 있다.
기본 텍스트 메시지 전송
import requests
import os
from datetime import datetime

# 환경 변수에서 토큰과 chat_id 가져오기 (하드코딩 금지)
BOT_TOKEN = os.environ.get("TELEGRAM_BOT_TOKEN")
CHAT_ID = os.environ.get("TELEGRAM_CHAT_ID")
BASE_URL = f"https://api.telegram.org/bot{BOT_TOKEN}"


def send_message(text: str, parse_mode: str = None) -> dict:
    """텔레그램 메시지를 전송한다.

    Args:
        text: 보낼 메시지 텍스트
        parse_mode: "HTML" 또는 "MarkdownV2" (선택)

    Returns:
        Telegram API 응답 딕셔너리
    """
    payload = {
        "chat_id": CHAT_ID,
        "text": text,
    }
    if parse_mode:
        payload["parse_mode"] = parse_mode

    response = requests.post(f"{BASE_URL}/sendMessage", json=payload)
    result = response.json()

    if not result.get("ok"):
        print(f"메시지 전송 실패: {result.get('description')}")
    return result


def send_photo(photo_path: str, caption: str = None) -> dict:
    """텔레그램으로 이미지를 전송한다.

    Args:
        photo_path: 로컬 이미지 파일 경로
        caption: 이미지 설명 (선택)

    Returns:
        Telegram API 응답 딕셔너리
    """
    payload = {"chat_id": CHAT_ID}
    if caption:
        payload["caption"] = caption

    with open(photo_path, "rb") as photo:
        files = {"photo": photo}
        response = requests.post(
            f"{BASE_URL}/sendPhoto", data=payload, files=files
        )
    return response.json()


# 사용 예시
if __name__ == "__main__":
    # 단순 텍스트 메시지
    send_message("✅ 서버 정상 가동 중")

    # 서버 상태 메시지
    now = datetime.now().strftime("%Y-%m-%d %H:%M:%S")
    status_msg = (
        f"📊 서버 상태 리포트\n"
        f"시간: {now}\n"
        f"CPU: 23%\n"
        f"메모리: 4.2GB / 8GB (52%)\n"
        f"디스크: 45GB / 100GB (45%)"
    )
    send_message(status_msg)

    # 그래프 이미지 전송 (matplotlib으로 생성한 차트 등)
    # send_photo("./server_stats.png", caption="24시간 CPU 사용량")
토큰과 chat_id는 반드시 환경 변수로 관리해야 한다. export TELEGRAM_BOT_TOKEN="7123456789:AAH_..."처럼 설정하거나, .env 파일에 넣고 python-dotenv로 로드하는 방식이 일반적이다.
HTML/Markdown 포맷팅과 인라인 키보드
일반 텍스트만 보내면 밋밋하다. 텔레그램 Bot API는 HTML과 MarkdownV2 두 가지 포맷팅을 지원한다. 개인적으로 HTML을 선호하는데, MarkdownV2는 특수문자 이스케이프가 까다롭기 때문이다. 점(.) 하나도 역슬래시로 이스케이프해야 해서 코드가 지저분해진다.
import requests
import os
import json

BOT_TOKEN = os.environ.get("TELEGRAM_BOT_TOKEN")
CHAT_ID = os.environ.get("TELEGRAM_CHAT_ID")
BASE_URL = f"https://api.telegram.org/bot{BOT_TOKEN}"


def send_html_message(text: str) -> dict:
    """HTML 포맷 메시지를 전송한다."""
    payload = {
        "chat_id": CHAT_ID,
        "text": text,
        "parse_mode": "HTML",
    }
    response = requests.post(f"{BASE_URL}/sendMessage", json=payload)
    return response.json()


def send_with_inline_keyboard(text: str, buttons: list) -> dict:
    """인라인 키보드가 포함된 메시지를 전송한다.

    Args:
        text: 메시지 텍스트
        buttons: [[{"text": "버튼명", "url": "https://..."}]] 형태

    Returns:
        Telegram API 응답 딕셔너리
    """
    payload = {
        "chat_id": CHAT_ID,
        "text": text,
        "parse_mode": "HTML",
        "reply_markup": json.dumps({
            "inline_keyboard": buttons
        }),
    }
    response = requests.post(f"{BASE_URL}/sendMessage", json=payload)
    return response.json()


# HTML 포맷 예시 — 배포 알림
deploy_msg = """
🚀 배포 완료

프로젝트: my-web-app
브랜치: main
커밋: a1b2c3d
작성자: kyunghun
시간: 2026-04-02 14:30:22

변경사항:
- 로그인 페이지 리디자인
- API 응답 캐시 적용
- 결제 모듈 버그 수정

커밋 상세 보기
"""
send_html_message(deploy_msg)

# 인라인 키보드 — 에러 발생 시 즉시 대응 버튼
error_msg = "🔥 에러 감지\n\nNullPointerException in PaymentService\n서버: prod-01"
keyboard = [
    [
        {"text": "📋 로그 확인", "url": "https://grafana.myserver.com/logs"},
        {"text": "🔄 서버 재시작", "callback_data": "restart_prod01"},
    ],
    [
        {"text": "🔇 1시간 음소거", "callback_data": "mute_1h"},
    ],
]
send_with_inline_keyboard(error_msg, keyboard)


# MarkdownV2 포맷 (특수문자 이스케이프가 필요한 경우)
def escape_markdown_v2(text: str) -> str:
    """MarkdownV2에서 이스케이프가 필요한 특수문자를 처리한다.

    텔레그램 MarkdownV2는 아래 문자를 모두 역슬래시로 이스케이프해야 한다:
    _ * [ ] ( ) ~ ` > # + - = | { } . !
    """
    special_chars = r"_*[]()~`>#+-=|{}.!"
    escaped = ""
    for char in text:
        if char in special_chars:
            escaped += f"\\{char}"
        else:
            escaped += char
    return escaped


# MarkdownV2 사용 예시
md_msg = f"*서버 상태*\nCPU: `23%`\n메모리: `52%`\n{escape_markdown_v2('업타임: 14일 3시간')}"
payload = {
    "chat_id": CHAT_ID,
    "text": md_msg,
    "parse_mode": "MarkdownV2",
}
requests.post(f"{BASE_URL}/sendMessage", json=payload)
HTML에서 사용 가능한 태그는 <b>, <i>, <code>, <pre>, <a href="...">, <u>, <s> 정도이다. <div>나 <span> 같은 일반 HTML 태그는 지원하지 않다.
에러 핸들링 — 실전에서 터지는 케이스
로컬에서 테스트할 때는 잘 되다가 실내 운영에서 터지는 경우가 있다. 내가 겪은 주요 에러들과 해결법을 정리했다.
Rate Limit (429 에러)
텔레그램은 봇당 초당 30개, 같은 채팅방에는 초당 1개의 메시지 제한이 있다. 서버에서 에러가 폭주하면 알림도 폭주하고, 429 에러가 나면서 중요한 알림까지 씹힙니다.
메시지 길이 제한
텔레그램 메시지 하나의 최대 길이는 4096자이다. 로그를 통째로 보내려다가 잘리는 경우가 종종 있다.
import requests
import os
import time
from typing import Optional

BOT_TOKEN = os.environ.get("TELEGRAM_BOT_TOKEN")
CHAT_ID = os.environ.get("TELEGRAM_CHAT_ID")
BASE_URL = f"https://api.telegram.org/bot{BOT_TOKEN}"

# 텔레그램 메시지 최대 길이
MAX_MESSAGE_LENGTH = 4096


class TelegramNotifier:
    """재시도, 레이트리밋 처리, 메시지 분할을 포함한 텔레그램 알림 클래스."""

    def __init__(self, token: str, chat_id: str):
        self.token = token
        self.chat_id = chat_id
        self.base_url = f"https://api.telegram.org/bot{token}"
        self._last_send_time = 0
        self._min_interval = 1.1  # 같은 채팅방 초당 1개 제한 대응

    def _rate_limit_wait(self):
        """레이트리밋 방지를 위한 대기."""
        elapsed = time.time() - self._last_send_time
        if elapsed < self._min_interval:
            time.sleep(self._min_interval - elapsed)
        self._last_send_time = time.time()

    def send(
        self,
        text: str,
        parse_mode: Optional[str] = None,
        max_retries: int = 3,
    ) -> bool:
        """메시지를 전송한다. 긴 메시지는 자동 분할, 실패 시 재시도한다.

        Args:
            text: 전송할 텍스트
            parse_mode: "HTML" 또는 "MarkdownV2"
            max_retries: 최대 재시도 횟수

        Returns:
            전송 성공 여부
        """
        # 메시지가 최대 길이를 초과하면 분할
        if len(text) > MAX_MESSAGE_LENGTH:
            return self._send_long_message(text, parse_mode, max_retries)

        return self._send_single(text, parse_mode, max_retries)

    def _send_single(
        self, text: str, parse_mode: Optional[str], max_retries: int
    ) -> bool:
        """단일 메시지를 전송한다."""
        self._rate_limit_wait()

        payload = {"chat_id": self.chat_id, "text": text}
        if parse_mode:
            payload["parse_mode"] = parse_mode

        for attempt in range(max_retries):
            try:
                resp = requests.post(
                    f"{self.base_url}/sendMessage",
                    json=payload,
                    timeout=10,
                )
                result = resp.json()

                if result.get("ok"):
                    return True

                # 429 Too Many Requests 처리
                if resp.status_code == 429:
                    retry_after = result.get("parameters", {}).get(
                        "retry_after", 5
                    )
                    print(f"Rate limited. {retry_after}초 후 재시도...")
                    time.sleep(retry_after)
                    continue

                # 그 외 에러
                desc = result.get("description", "Unknown error")
                print(f"전송 실패 (시도 {attempt + 1}): {desc}")

                # parse_mode 관련 에러면 plain text로 재시도
                if "can't parse entities" in desc.lower():
                    print("포맷팅 에러 → plain text로 재시도")
                    payload.pop("parse_mode", None)
                    continue

            except requests.exceptions.Timeout:
                print(f"타임아웃 (시도 {attempt + 1}/{max_retries})")
            except requests.exceptions.ConnectionError:
                print(f"연결 실패 (시도 {attempt + 1}/{max_retries})")
                time.sleep(2 ** attempt)  # 지수 백오프

        return False

    def _send_long_message(
        self, text: str, parse_mode: Optional[str], max_retries: int
    ) -> bool:
        """4096자를 초과하는 메시지를 줄바꿈 기준으로 분할 전송한다."""
        chunks = []
        current_chunk = ""

        for line in text.split("\n"):
            if len(current_chunk) + len(line) + 1 > MAX_MESSAGE_LENGTH:
                if current_chunk:
                    chunks.append(current_chunk)
                current_chunk = line
            else:
                current_chunk += ("\n" if current_chunk else "") + line

        if current_chunk:
            chunks.append(current_chunk)

        print(f"메시지를 {len(chunks)}개로 분할 전송합니다.")
        all_success = True
        for i, chunk in enumerate(chunks):
            prefix = f"[{i + 1}/{len(chunks)}]\n" if len(chunks) > 1 else ""
            success = self._send_single(prefix + chunk, parse_mode, max_retries)
            if not success:
                all_success = False

        return all_success


# 사용 예시
if __name__ == "__main__":
    notifier = TelegramNotifier(
        token=os.environ["TELEGRAM_BOT_TOKEN"],
        chat_id=os.environ["TELEGRAM_CHAT_ID"],
    )

    # 일반 메시지
    notifier.send("✅ 배포 완료: my-web-app v2.3.1")

    # HTML 포맷
    notifier.send(
        "🔥 에러 감지\nTypeError: Cannot read property",
        parse_mode="HTML",
    )

    # 긴 로그도 자동 분할
    long_log = "에러 로그:\n" + "\n".join(
        [f"[2026-04-02 14:30:{i:02d}] ERROR: 처리 실패 line {i}" for i in range(200)]
    )
    notifier.send(long_log)
can't parse entities 에러는 HTML 모드에서 <, >, &를 이스케이프하지 않았을 때 발생한다. 로그 메시지에 이런 문자가 포함될 수 있으니, 로그 전송 시에는 parse_mode를 빼거나 html.escape()를 적용하는 게 안전하다.
스케줄링 — cron과 schedule 라이브러리
봇을 수동으로 실행하는 건 의미가 없다. 자동으로 돌아야 봇이다. 두 가지 방법을 비교해보겠다.
방법 1: Linux cron
가장 단순하고 안정적이다. 서버에 이미 cron이 있으니 별도 설치가 필요 없다.
# crontab 편집
crontab -e

# 매일 아침 9시에 서버 상태 리포트 전송
0 9 * * * /usr/bin/python3 /home/deploy/telegram_bot/daily_report.py >> /var/log/telegram_bot.log 2>&1

# 5분마다 서버 상태 체크 (CPU, 메모리 임계값 초과 시 알림)
*/5 * * * * /usr/bin/python3 /home/deploy/telegram_bot/health_check.py >> /var/log/telegram_bot.log 2>&1

# 매주 월요일 10시에 주간 리포트
0 10 * * 1 /usr/bin/python3 /home/deploy/telegram_bot/weekly_report.py >> /var/log/telegram_bot.log 2>&1
cron 설정에서 자주 하는 실수가 두 가지 있다. 첫째, Python 경로를 python3로만 쓰면 cron 환경에서 못 찾는 경우가 있다. 반드시 /usr/bin/python3처럼 절대 경로를 써야 한다. 둘째, 환경 변수가 cron에서는 로드되지 않다. 스크립트 안에서 직접 .env 파일을 읽거나, crontab 상단에 환경 변수를 선언해야 한다.
# crontab 상단에 환경 변수 선언
TELEGRAM_BOT_TOKEN=7123456789:AAH_your-token-here
TELEGRAM_CHAT_ID=9876543210

# 이후 cron job에서 해당 변수 사용 가능
*/5 * * * * /usr/bin/python3 /home/deploy/telegram_bot/health_check.py
방법 2: Python schedule 라이브러리
cron보다 유연한 스케줄링이 필요하면 schedule 라이브러리가 편하다. 특히 “에러가 3번 연속 발생하면 알림”처럼 상태를 유지해야 하는 경우에 적합하다.
import schedule
import time
import psutil
import os
from datetime import datetime

# pip install schedule psutil

BOT_TOKEN = os.environ.get("TELEGRAM_BOT_TOKEN")
CHAT_ID = os.environ.get("TELEGRAM_CHAT_ID")
BASE_URL = f"https://api.telegram.org/bot{BOT_TOKEN}"

# 위에서 만든 TelegramNotifier 클래스를 import 한다고 가정
# from notifier import TelegramNotifier
# notifier = TelegramNotifier(BOT_TOKEN, CHAT_ID)

# 간단 버전: requests로 직접 전송
import requests

def send_alert(text):
    requests.post(f"{BASE_URL}/sendMessage", json={
        "chat_id": CHAT_ID, "text": text, "parse_mode": "HTML"
    })


def check_server_health():
    """서버 상태를 확인하고 임계값 초과 시 알림을 보낸다."""
    cpu_percent = psutil.cpu_percent(interval=1)
    memory = psutil.virtual_memory()
    disk = psutil.disk_usage("/")

    alerts = []

    if cpu_percent > 80:
        alerts.append(f"🔥 CPU 사용량: {cpu_percent}% (임계값: 80%)")
    if memory.percent > 85:
        alerts.append(
            f"🔥 메모리 사용량: {memory.percent}% "
            f"({memory.used // (1024**3)}GB / {memory.total // (1024**3)}GB)"
        )
    if disk.percent > 90:
        alerts.append(
            f"🔥 디스크 사용량: {disk.percent}% "
            f"({disk.used // (1024**3)}GB / {disk.total // (1024**3)}GB)"
        )

    if alerts:
        now = datetime.now().strftime("%Y-%m-%d %H:%M")
        msg = f"⚠️ 서버 경고 ({now})\n\n" + "\n".join(alerts)
        send_alert(msg)
        print(f"[{now}] 경고 알림 전송: {len(alerts)}건")
    else:
        print(f"[{datetime.now().strftime('%H:%M')}] 서버 상태 정상")


def send_daily_report():
    """일일 서버 리포트를 전송한다."""
    cpu = psutil.cpu_percent(interval=3)
    mem = psutil.virtual_memory()
    disk = psutil.disk_usage("/")
    boot = datetime.fromtimestamp(psutil.boot_time())
    uptime = datetime.now() - boot

    report = (
        f"📊 일일 서버 리포트\n"
        f"{datetime.now().strftime('%Y-%m-%d %H:%M')}\n\n"
        f"CPU: {cpu}%\n"
        f"메모리: {mem.percent}% ({mem.used // (1024**3)}GB / {mem.total // (1024**3)}GB)\n"
        f"디스크: {disk.percent}% ({disk.used // (1024**3)}GB / {disk.total // (1024**3)}GB)\n"
        f"업타임: {uptime.days}일 {uptime.seconds // 3600}시간\n"
    )
    send_alert(report)
    print("일일 리포트 전송 완료")


# 스케줄 등록
schedule.every(5).minutes.do(check_server_health)  # 5분마다 상태 체크
schedule.every().day.at("09:00").do(send_daily_report)  # 매일 9시 리포트

print("텔레그램 알림봇 시작됨. Ctrl+C로 종료.")
print(f"등록된 작업: {len(schedule.get_jobs())}개")

# 메인 루프
try:
    while True:
        schedule.run_pending()
        time.sleep(1)
except KeyboardInterrupt:
    print("\n봇 종료됨.")
schedule 라이브러리의 장점은 코드 안에서 스케줄을 관리할 수 있다는 것이다. 단점은 프로세스가 죽으면 스케줄도 같이 죽는다는 점인데, 이건 systemd 서비스로 등록하거나 supervisor를 쓰면 해결된다.
실전 활용 사례 — 배포 알림, 에러 알림, 일일 리포트
지금까지 만든 코드를 실전 시나리오에 적용해보겠다.
GitHub Actions 배포 알림
CI/CD 파이프라인 마지막 단계에 텔레그램 알림을 추가하면, 배포 결과를 실시간으로 확인할 수 있다. 별도 Python 스크립트 없이 curl로도 가능하다.
# .github/workflows/deploy.yml
name: Deploy and Notify

on:
  push:
    branches: [main]

jobs:
  deploy:
    runs-on: ubuntu-latest
    steps:
      - uses: actions/checkout@v4

      - name: Deploy to server
        run: |
          # 배포 스크립트 실행
          ssh [email protected] "cd /app && git pull && docker compose up -d"

      - name: Notify Telegram (Success)
        if: success()
        run: |
          COMMIT_MSG=$(git log -1 --pretty=format:'%s')
          COMMIT_SHA=$(git rev-parse --short HEAD)
          AUTHOR=$(git log -1 --pretty=format:'%an')

          MESSAGE="✅ 배포 성공%0A%0A"
          MESSAGE+="📦 프로젝트: ${{ github.repository }}%0A"
          MESSAGE+="🔀 브랜치: ${{ github.ref_name }}%0A"
          MESSAGE+="📝 커밋: ${COMMIT_SHA} ${COMMIT_MSG}%0A"
          MESSAGE+="👤 작성자: ${AUTHOR}%0A"
          MESSAGE+="🕐 시간: $(date '+%Y-%m-%d %H:%M:%S KST')"

          curl -s -X POST \
            "https://api.telegram.org/bot${{ secrets.TELEGRAM_BOT_TOKEN }}/sendMessage" \
            -d chat_id=${{ secrets.TELEGRAM_CHAT_ID }} \
            -d parse_mode=HTML \
            -d text="${MESSAGE}"

      - name: Notify Telegram (Failure)
        if: failure()
        run: |
          MESSAGE="❌ 배포 실패%0A%0A"
          MESSAGE+="📦 ${{ github.repository }}%0A"
          MESSAGE+="🔗 GitHub Actions 로그 확인"

          curl -s -X POST \
            "https://api.telegram.org/bot${{ secrets.TELEGRAM_BOT_TOKEN }}/sendMessage" \
            -d chat_id=${{ secrets.TELEGRAM_CHAT_ID }} \
            -d parse_mode=HTML \
            -d text="${MESSAGE}"
GitHub Actions에서 secrets.TELEGRAM_BOT_TOKEN과 secrets.TELEGRAM_CHAT_ID를 사용하려면, 레포지토리 Settings → Secrets and variables → Actions에서 등록해야 한다.
Python 예외 발생 시 자동 알림
운영 중인 Python 애플리케이션에서 예외가 발생하면 즉시 텔레그램으로 받고 싶을 때가 있다. logging 핸들러로 구현하면 기존 코드를 거의 수정하지 않아도 된다.
import logging import traceback import requests import os from datetime import datetime BOT_TOKEN = os.environ.get("TELEGRAM_BOT_TOKEN") CHAT_ID = os.environ.get("TELEGRAM_CHAT_ID") BASE_URL = f"https://api.telegram.org/bot{BOT_TOKEN}" class TelegramLogHandler(logging.Handler): """ERROR 이상의 로그를 텔레그램으로 전송하는 핸들러.""" def __init__(self, token: str, chat_id: str): super().__init__() self.base_url = f"https://api.telegram.org/bot{token}" self.chat_id = chat_id def emit(self, record: logging.LogRecord): try: # 로그 메시지 포맷팅 (HTML 태그 이스케이프) import html log_msg = html.escape(self.format(record)) # 예외 정보가 있으면 추가 if record.exc_info and record.exc_info[1]: tb = "".join(traceback.format_exception(*record.exc_info)) # 트레이스백이 너무 길면 마지막 500자만 if len(tb) > 500: tb = "...\n" + tb[-500:] tb = html.escape(tb) log_msg += f"\n\n{tb}"
message = (
f"🚨 [{record.levelname}]\n"
f"{datetime.now().strftime('%Y-%m-%d %H:%M:%S')}\n\n"
f"{log_msg}"
)# 4096자 제한
if len(message) > 4096:
message = message[:4090] + "\n..."requests.post(
f"{self.base_url}/sendMessage",
json={
"chat_id": self.chat_id,
"text": message,
"parse_mode": "HTML",
},
timeout=5,
)
except Exception:
self.handleError(record)# 사용법: 기존 로거에 핸들러만 추가하면 끝
logger = logging.getLogger("my_app")
logger.setLevel(logging.DEBUG)# 콘솔 핸들러 (기존)
console_handler = logging.StreamHandler()
console_handler.setLevel(logging.DEBUG)
logger.addHandler(console_handler)# 텔레그램 핸들러 추가 (ERROR 이상만)
telegram_handler = TelegramLogHandler(BOT_TOKEN, CHAT_ID)
telegram_handler.setLevel(logging.ERROR)
logger.addHandler(telegram_handler)# 이제 logger.error()만 호출하면 자동으로 텔레그램 알림이 간다
def process_payment(user_id, amount):
try:
# 결제 처리 로직...
result = 1 / 0 # 의도적 에러 예시
except Exception as e:
logger.error(
f"결제 처리 실패 - user_id: {user_id}, amount: {amount}",
exc_info=True, # 트레이스백 포함
)# 테스트
process_payment("user_123", 50000)이 방식의 장점은 기존 코드에
logger.error()만 있으면 텔레그램 핸들러가 알아서 알림을 보낸다는 것이다. 새로운 try-except를 추가할 필요가 없다.하루 마무리 — 정리
정리하면 텔레그램 봇 알림 시스템의 전체 흐름은 이렇다.
| 단계 | 할 일 | 소요 시간 |
|---|---|---|
| 1 | BotFather에서 봇 생성 + 토큰 수령 | 2분 |
| 2 | 봇에게 메시지 보내고 chat_id 확인 | 3분 |
| 3 | sendMessage 테스트 | 2분 |
| 4 | TelegramNotifier 클래스 작성 | 10분 |
| 5 | cron 또는 schedule 설정 | 5분 |
처음 시작할 때 가장 흔한 실수 세 가지를 다시 짚어두겠다.
- 토큰 노출: 코드에 직접 쓰지 말고, 반드시 환경 변수나
.env파일로 관리해야 한다. 실수로 GitHub에 올리면 BotFather에서/revoke로 토큰을 즉시 재발급받아야 한다. - chat_id를 문자열로 넣기: chat_id는 숫자지만, requests의 json 파라미터로 넘기면 자동 직렬화되니 크게 문제없다. 다만 문자열 형태의 환경 변수에서 읽을 때
int()변환이 필요한 상황이 간혹 있다. - getUpdates 빈 결과: 봇에게 메시지를 보내지 않았거나, webhook이 설정된 상태면 getUpdates가 동작하지 않다.
/deleteWebhook을 먼저 호출해야 할 수 있다.
솔직히 텔레그램 봇 API는 내가 써본 메시징 API 중에서 진입 장벽이 가장 낮다. OAuth도 없고, 별도 앱 승인 과정도 없고, REST API 한 번 호출이면 끝이다. 모니터링이 필요한 사이드 프로젝트가 있다면, 10분만 투자해서 알림봇부터 붙여보는 걸 권한다. 서버가 터지고 나서야 알게 되는 것보다는, 터지기 직전에 폰에 알림 하나 오는 게 훨씬 낫다.